 So you want to create a blog button hassle free? Here's the easiest way how (short of having someone else do it for you of course)!
1. First, you need a blank canvas for your button, literally. The easiest way to do this (instead of making it yourself) is to download and save this one: blog button 125x125 (right click>'save image as'). It will save as a blank box for you to start creating your new button!
2. Open the blank blog button in PicMonkey and create away! Upload the blog button you just saved, under edit photo. Start adding font, color, your logo etc. For more detailed description on how to do this, check out this tutorial on creating Word Art (half way down through post and start with step #4). Add you own logo by clicking 'Overlay,' then 'Your Own' at the top. Bam!
☝Make sure to merge your layers on your blog button before saving. This way it saves it as a one "piece" image, instead of an image with fonts, colors etc.
☝ Also: save as a PNG file! I've noticed they don't turn up as grainy as the JPEG.
This is my button after everything is said and done! Just text and a few circles in black and white.
3. Upload your saved blog button to your online photo book. I use Flickr. Get the HTML code for the photo you've just uploaded. ☟ (For the time being, copy this code into a blank Word Doc. You'll only need one part from it before deleting it. Set aside for step 4.)
4. Now that you have your blog button ready and saved, go to Grab My Button Code Generator (to get the html code for under your button so others can copy and share your button)!
Plug in all your information that it prompts you for:
-your homepage title and URL
-the HTML code for your blog button image
(go back to your copied HTML code in your Word Doc, and get the WHOLE line of text for your photo location. You'll notice it has a .JPEG at the end. You can see where my photo link was in the code, below. This is ALL you'll need from this section of code. You can delete it after you've copied your photo location.)
I changed no settings (colors, borders etc) when I typed my information in. You may if you'd like.
5. Grab your new generated blog code! Press preview and get the code. Your code will then show at the bottom of the page, under preview.
6. Once you have your generated blog button code copied, you can insert it onto your blog platform.
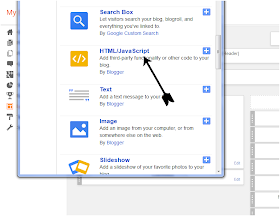
Since I have Blogger, I click Layout>Add a Gadget>Click add HTML/JavaScript>paste your code (and save). Done!
It will then show up on your right hand side bar (you can see it in my picture above, at the bottom of my column, since I already had it created).
How hassle free was that for your newly created blog button??!! No writing any HTML code or copying code from other sites and inserting your information etc. Boo-ya, you're welcome! :o)


No comments:
Post a Comment