Showing posts with label blog. Show all posts

April 24, 2014

How to make an Animated GIF with Photos in 3 steps!

How to GIF on Make A Gif

I wanted to be able to create an animated GIF for my toddler quiet book page post, to show how the pages were interactive.

If I would have known that it was SO EASY, I would have done it sooner!! It can be done in 3 easy steps.

Before making your animated GIF
Have your pictures ready to go by:
1)having them uploaded to your computer 
and 
2)make sure your pictures (combined) are 2 MB or less. 

If you need to resize them, like me, you can use think link to help with that. All I did was open up both of my pictures up in Microsoft Office Picture Manager (right click on a picture>Open With>Microsoft Office Picture Manager). Mine came standard on my computer. At the menu bar, click Picture>Resize>Percentage of Original width x height: 100%. I chose to lower both pictures to 40%, clicked OK and then 'saved as' for my new picture.

When taking your pictures for the animation, make sure that you use a tripod! This will make sure that the camera stays in the same position while shooting your photos. Also try to not to move the item you are shooting. My animations aren't perfect and you can see a little movement between the two pictures.

Creating your animated GIF
1. Create a free account at Make a Gif. This way your GIF won't be watermarked with their logo! Then click 'create a gif,' or 'add pictures.'

2. Upload your pictures, using the control key to select more than one. Select your settings (order of pictures, speed {I use slower} etc.) You can also make these private if you don't want to share what you've created. Score!

3. Click 'create your gif' and you're done! When it's finished you can chose how to share it: direct, message board, website or markdown. I always use the website embed code, copy it, and paste it into my blog's html box.

Didn't I say it would be easy??!! What animated GIFs have you made? I'd love to see them!


December 4, 2013

A {Hassle free} way to make your own Blog Button!

So you want to create a blog button hassle free? Here's the easiest way how (short of having someone else do it for you of course)!

1. First, you need a blank canvas for your button, literally. The easiest way to do this (instead of making it yourself) is to download and save this one: blog button 125x125 (right click>'save image as'). It will save as a blank box for you to start creating your new button!

2. Open the blank blog button in PicMonkey and create away! Upload the blog button you just saved, under edit photo. Start adding font, color, your logo etc. For more detailed description on how to do this, check out this tutorial on creating Word Art (half way down through post and start with step #4). Add you own logo by clicking 'Overlay,' then 'Your Own' at the top. Bam!


Make sure to merge your layers on your blog button before saving. This way it saves it as a one "piece" image, instead of an image with fonts, colors etc. 
Also: save as a PNG file! I've noticed they don't turn up as grainy as the JPEG.

This is my button after everything is said and done! Just text and a few circles in black and white.

3. Upload your saved blog button to your online photo book. I use Flickr. Get the HTML code for the photo you've just uploaded. ☟ (For the time being, copy this code into a blank Word Doc. You'll only need one part from it before deleting it. Set aside for step 4.)
4. Now that you have your blog button ready and saved, go to Grab My Button Code Generator (to get the html code for under your button so others can copy and share your button)! 

Plug in all your information that it prompts you for:
-your homepage title and URL
-the HTML code for your blog button image 
(go back to your copied HTML code in your Word Doc, and get the WHOLE line of text for your photo location. You'll notice it has a .JPEG at the end. You can see where my photo link was in the code, below. This is ALL you'll need from this section of code. You can delete it after you've copied your photo location.)
I changed no settings (colors, borders etc) when I typed my information in. You may if you'd like.

5. Grab your new generated blog code! Press preview and get the code. Your code will then show at the bottom of the page, under preview.
6. Once you have your generated blog button code copied, you can insert it onto your blog platform
Since I have Blogger, I click Layout>Add a Gadget>Click add HTML/JavaScript>paste your code (and save). Done!
It will then show up on your right hand side bar (you can see it in my picture above, at the bottom of my column, since I already had it created).

How hassle free was that for your newly created blog button??!! No writing any HTML code or copying code from other sites and inserting your information etc. Boo-ya, you're welcome! :o)


September 13, 2013

Tutorial: Customized Photos and Documents using PicMonkey: Part 3 (Photo on Photo and Transparent Background/Watermark)

This tutorial will give a step by step how to on how to insert photos onto photos to creating overlapping photo images/docs as well as how to create a transparent background to use for different creations.

This is part three of  my PicMonkey tutorial mini-series. This post may refer to steps that have already been introduced in part one and part two. You may need to refer back if you have not read these posts.

Inserting a Photo onto a Photo
1. Open 'edit photo' in Picmonkey. Choose your 4x6 blank canvas (we learned how to create this in part two). 
2. Now that you have a blank canvas to work with, go to the 'overlays tab' and choose 'your own' at the top.
3. If you'd like a photo as your background, choose your photo, and drag the edges of the photo to enlarge it and fill the entire white canvas. If it doesn't fit your canvas exactly, you can always crop to cut off any white edging you might have. (If you don't want a picture as the background, then just adjust the size of the picture and lay it on the canvas where ever you'd like. Want to change your white background to color? Check out part two).
4. Now that you have your background set, go back to choosing 'your own' at the top of the overlays tab and open as many pictures as you'd like to drop on top of your background. You can also add text and effects as well as right clicking any image or text and choosing 'bring to the front' etc.
5. When you are finished, just click 'save' at the top!

Using these steps, this is how I created my son's birth announcement! 
(To print these pictures, I just uploaded my saved image to Walgreen's photo center under my account and printed out however many I needed. Since I used the 4x6 blank canvas, I just made sure my picture background was the same size of the blank canvas. It may have been overlapping a little, but not cutting anything off important. When I printed my pictures, they came out as nice 4x6's.)
I also created my son's birthday invitations and Christmas cards 
using these steps too.
How to create a transparent background (plus, add a watermark)
1. Open 'create a collage' in Picmonkey.
2. Next, click 'layouts,' then at the top click 'create your own.' This will make it one large box.
3. Now click 'background' and then check the box for transparent background at the bottom.
4. Click save at the top. Save this transparent background as '.png' so it remains transparent.
3. Go back to Picmonkey's home page and open this transparent background you just saved, under 'edit photo.' (Note: It may have looked like it saved as a black box in your folder but it will still show up transparent.) When you open it up, it will look like nothing is there.
4. Add whatever background you'd like. I chose this paper scrap under 'over lays', since I wanted to be able to see the paper edging. Drag the background to the desired size. You'll know you've got outside of the transparent image you've opened, when the sides start cutting off the image your sizing.
5. Before adding text, right click your background (if it's a symbol or picture) and select 'send to back.'
6. When finished, chose the 'crop' option under the first tab on the left, 'basic edits.' You'll be able to see how your finished image will look like when it's highlighted for cropping.
 What my image looks like after it's cropped. It automatically zooms in.
7. If you're not satisfied, chose the 'crop' option again, and make any changes.
Another imaged used with a transparent background:
(only difference is there is no piece of paper as a background like the above steps):
Then I used this tag and added it to a photo using the 'photo on photo' steps listed above, then faded it a bit (how to fade- see part one, step #3). You can use this to add watermarks to your images.

Yea! You've made it through all three parts of my mini PicMonkey tutorial! :o)

September 9, 2013

Tutorial: Customized Photos and Documents using PicMonkey: Part 2 (Collage & Word Art)

Creating a Collage and Word Art
This is part two of  my PicMonkey tutorial mini-series. This post may refer to steps that have already been introduced in part one. You may need to refer back if you have not read this post.

Create a Collage
1. Click 'create a collage' in PicMonkey.
2. Click 'open photos.' Once you have chosen and selected your photos to upload, they will appear on the left hand column as shown below.
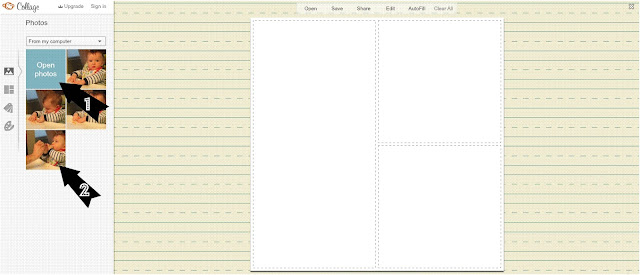
3.Once you have your pictures uploaded, click on the 'layout' symbol and then choose from the many layouts available. Click the layout you'd like. Below, I chose the Ducks in a Row layout for four photos.
4. Click back to 'photos,' then drag and drop your photos into the blank boxes. You'll see that each photo has been marked with a check mark once it has been used. If you end up not wanting to use all the boxes in the collage, hover over the empty box and an X will appear in the top right hand corner. Click it and the box will delete (you can see the difference between picture #4 and #5 below).
5. To change the border color around your photos, click the backgrounds icon on the very bottom, then change the color. You can also adjust the spacing of color between your photos from this edit box as well to make thick or thin color border. I kept mine thin.
6. You can also make your own collage. Open any collage design and drag and drop your desired picture into the collage. Drop the picture into the collage once a section of the collage has dimmed gray, showing where it would be inserted (shown below).


Examples of collages, using different layouts:

These are C's newborn photos. I made this 5x7 collage for a great 
customized frame I purchased.
 There are many photos in this collage! Paired with text and symbols.
 Just text.
 Just text, border color and two tiny symbols.
 A collage with a border color. 
I then saved it, reopened it and edited it as a photo, and added text.
My sister's senior pictures, which I took. Do you like? Check out the photo session here :o)
I used the drag and drop method to create my own collage design.

Create Word Art (can be used for invitations, posters etc.)
1. First you'll need to make a blank canvas. Open PicMonkey collage. Delete all the collage cells so only one big blank box is left (how-to delete boxes is in 'create a collage' above).
2. Once you have your blank space you'll want to adjust the blank canvas dimensions. They are at the bottom of the screen. (See above) Choose which photo dimensions you'd like to have and enter the dimensions (ex. you want a 4x6 finished photo, enter in 1600x2400). Then lock the dimensions in by clicking the lock.
3. Save your blank canvas and reopen in PicMonkey under 'edit a photo.'
4. Your blank canvas will pop up and the possibilities are endless! Add different types and sizes of text.
5. And a background color. Click on effects, scroll down to 'Draw,' choose your color, then draw it on. 
(You can also change the background color while still in the collage editing platform, but I always like to save mine as a white blank photo so I can keep reusing them by just changing the color instead of making a blank canvas each time)
You can also add symbols, labels, borders etc.

Examples of Word Art:

I created this word art for my son. It's just different colored text arranged on an 8x10 blank canvas. I left the background white so it looks like a poster when hung in a frame. (Middle and last name blurred our for privacy, you understand). The dots are just a row of periods, and to space out his weight shown, I just inserted spaces with the space bar.
I used this word art strategy for my son's birthday party invitation as well (below). I edited a blank 5x7 canvas, added text, drew on the background with blue and yellow with soft edges. You can control that in the edit box when you're on 'draw,' and I added a picture. 

Wait...added a picture on top of another picture you say? How, you wonder? That will be in part three. :o)

Presto! An easy made invitation for free! Even better, I'm sending them via email from a free site = more free. Yea!!
(You can also block out information, like I did above using PicMonkey. Simply add however many rectangular shapes you'll need to block your information, change the length of your shape by clicking and dragging the corner to your desired shape, and place on top of your information! Save image under a different name so you don't overwrite your original image. Done!)
 
This was a practice word art I made. I didn't end up using it, but I used the same steps that I mentioned previously. I used a blank canvas, added a label and symbol, and added text and a picture.

 *All photos are my property and cannot be used without my permission.*

Last but not least, part three!

Related Posts Plugin for WordPress, Blogger...